Port forwarding with Netgear Genie can seem daunting at first. But it’s actually quite simple once you understand the basics.
Port forwarding is a technique that allows devices outside your network to connect to a specific device within your network. This is especially useful for gaming, remote desktop access, and hosting servers. Netgear Genie, a popular router management tool, makes this process easier.
By guiding you through the steps, it ensures your devices get the access they need. In this blog post, we’ll explore how to set up port forwarding using Netgear Genie. Whether you’re new to networking or just need a refresher, this guide will help you navigate the process with ease. Let’s get started!
Introduction To Port Forwarding
Port Forwarding with Netgear Genie allows users to direct traffic from the internet to specific devices on a local network. Easily control and manage port settings to enhance network performance and security.
What Is Port Forwarding?
Port forwarding lets devices on the internet connect to a specific device in your local network. Think of it as a traffic director. It tells data where to go. This is useful for gaming or remote work. Your device gets data quickly and directly.
Importance Of Port Forwarding
Port forwarding is important for a smooth online experience. It helps with online gaming, video calls, and more. Data reaches your device without delay. This means less lag and better performance. It also makes remote access to files easier. You can get what you need from anywhere. Securely and quickly.
Netgear Genie Overview
Netgear Genie is a tool to manage your network. It has many useful features. You can monitor your network from your phone. It shows who is using your Wi-Fi. You can change settings easily.
It also helps to solve problems. You can fix network issues fast. The app has a simple interface. Anyone can use it. No need for tech skills. Just follow the steps.
Netgear Genie works on many devices. It supports Windows and Mac computers. You can use it on your smartphone too. Both iOS and Android are supported. Tablets work as well. This makes it very flexible.
Some routers might not work with it. Check your router model first. Most Netgear routers are compatible. Using this tool is easy and handy for any home network.
Setting Up Netgear Genie
First, you need to download the Netgear Genie software. Visit the Netgear website. Find the download link for Genie. Click on it. Save the file to your computer.
Open the downloaded file. Follow the on-screen instructions. Agree to the terms and conditions. Click “Next” to proceed. Choose the installation location. Click “Install” to start the process. Wait for the installation to finish. Click “Finish” to complete.
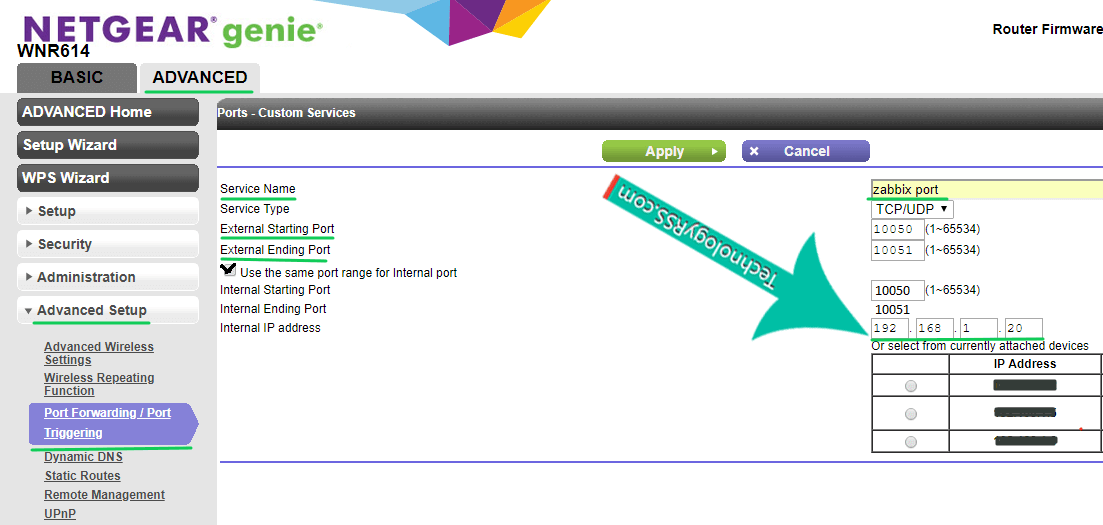
Credit: technologyrss.com
Accessing Router Settings
First, connect your device to the Netgear router. Open a web browser. Type “http://www.routerlogin.net” in the address bar. Press Enter. A login screen appears. Enter your username and password. The default username is “admin”. The default password is “password”. Click “Log In”. You will see the Netgear Genie dashboard.
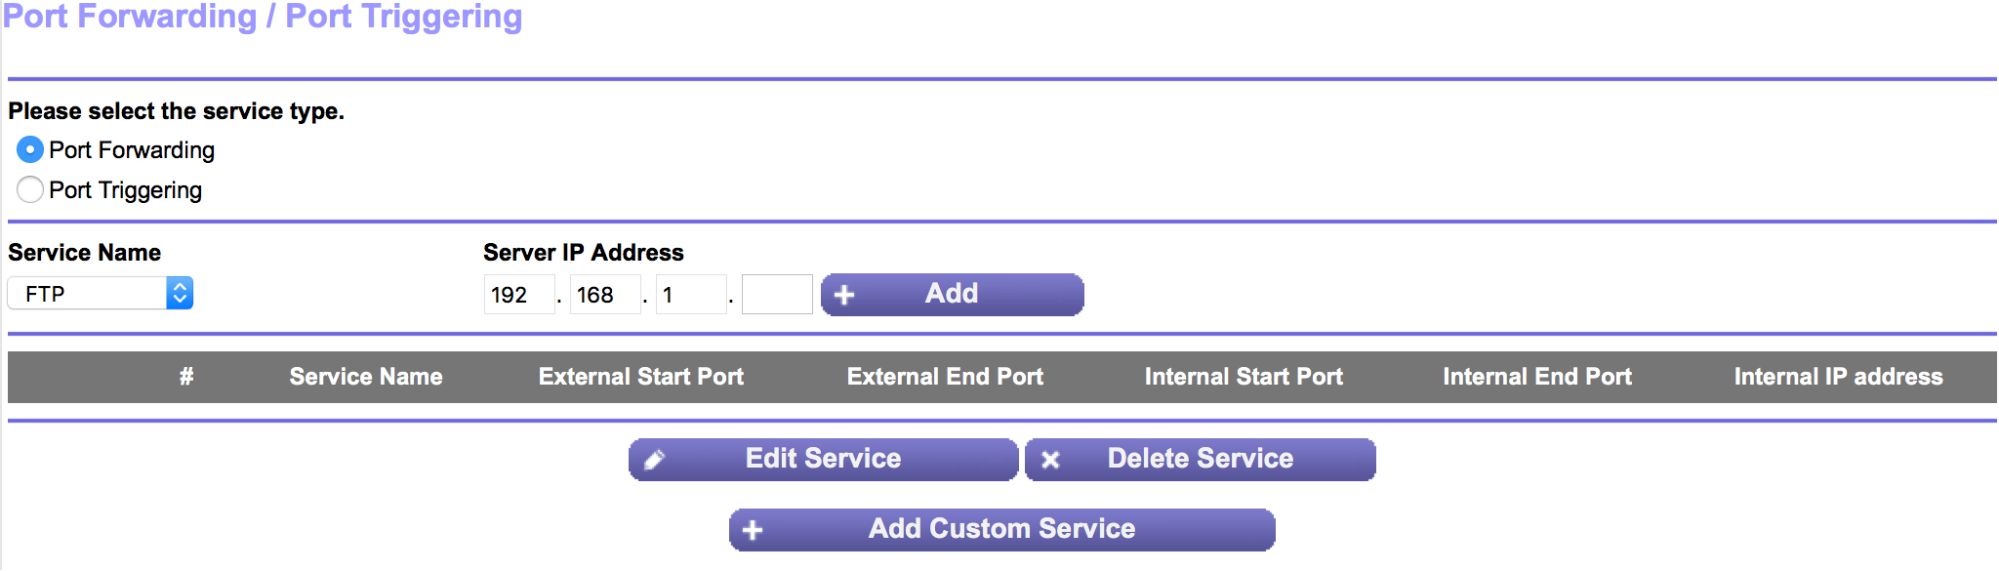
On the dashboard, look for the “Advanced” tab. Click it. You will see more options. Find “Advanced Setup”. Click on it. Next, click “Port Forwarding/Port Triggering”. The port settings page opens. Here, you can add new port rules. Remember to save your changes. Your port forwarding setup is now complete.
Configuring Port Forwarding
First, open the Netgear Genie app. Go to the Router Settings. Next, click on Advanced. Then, find the IP Address section. Write down your IP Address. You will need it later.
Open Netgear Genie and go to Router Settings. Click on Advanced again. Find the Port Forwarding section. Click on Add Custom Service. Enter a name for your service. Choose a Service Type. Enter your IP Address from before. Add the Port Numbers you need. Click Apply to save the rules.
Testing Port Forwarding
Online tools can help check if port forwarding works. Websites like “CanYouSeeMe” are helpful. Enter the port number and click “Check”. The tool shows if the port is open. If it is not, double-check your settings. Another tool is “Port Checker”. It works in a similar way. These tools are easy to use and free. They save time and effort. Using them ensures your ports are open.
Check your IP address first. It must be correct. Ensure the port number is right. Sometimes firewalls block ports. Disable the firewall temporarily. Also, make sure your router is up to date. Outdated firmware causes problems. Restart the router after changes. This helps apply new settings. If issues persist, contact your ISP. They can provide additional help.
Security Considerations
Port forwarding can create security risks. Hackers may try to get into your network. This can lead to data theft. It’s important to be aware of these risks. Always keep your router firmware up to date. Use strong passwords for your router.
Use a firewall to protect your network. Limit the number of ports you forward. Only open ports that are necessary. Close them when not in use. Regularly check for suspicious activity. This helps keep your network safe.

Credit: kb.netgear.com
Advanced Features
Remote access lets you control your network from far away. Set it up in your Netgear Genie. Go to the Advanced tab. Click on Remote Management. Enable the feature. Set a strong password. Choose the IP address range. Now, you can manage your network remotely.
Custom port forwarding lets you open specific ports. This helps with online games and apps. In Netgear Genie, go to Advanced Setup. Click on Port Forwarding/Port Triggering. Add a new custom service. Enter the service name. Type the port number. Select the protocol. Enter the device IP address. Save the settings. Your rules are now active.
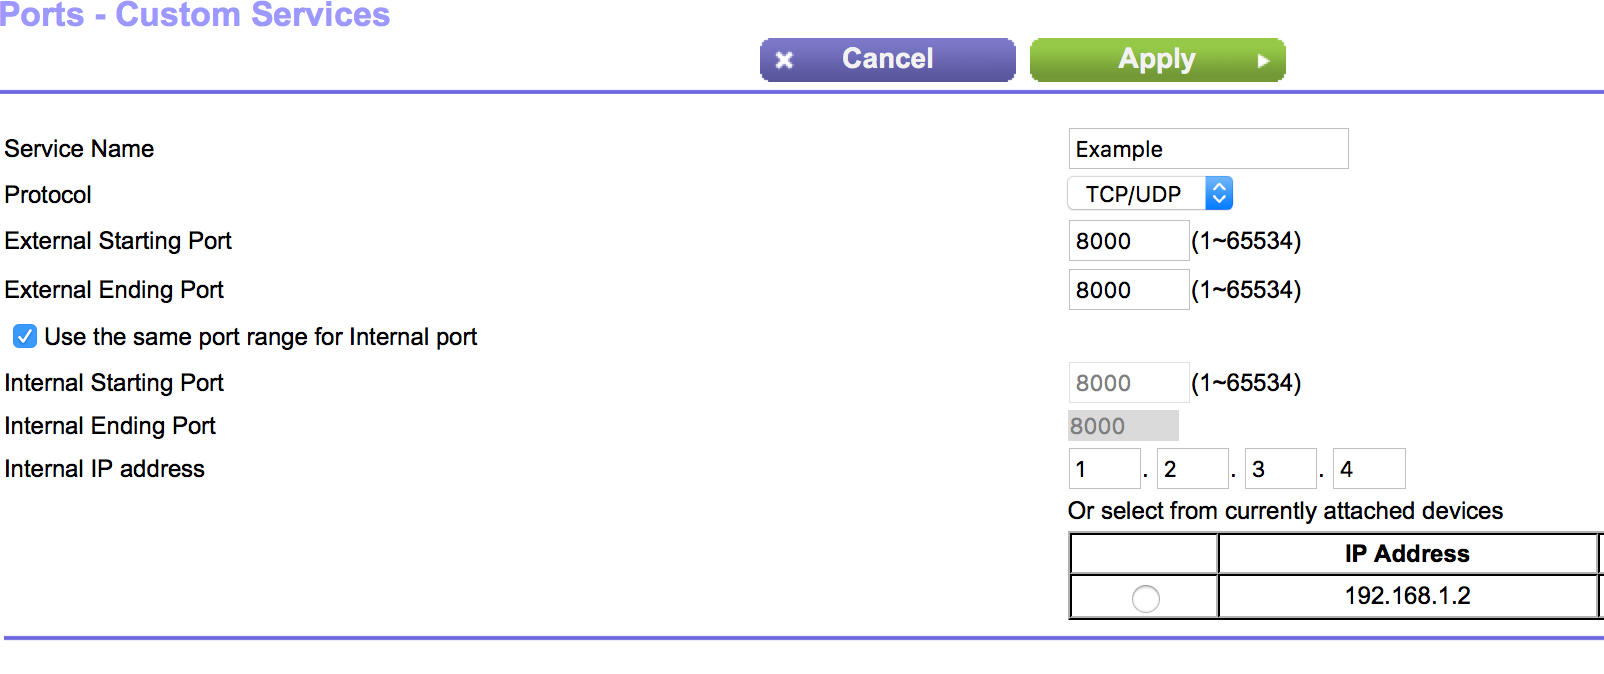
Credit: www.noip.com
Frequently Asked Questions
What Is Port Forwarding On Netgear Genie?
Port forwarding on Netgear Genie redirects external traffic to a specific device on your local network. This enhances connectivity for applications like gaming, servers, or remote access.
How To Access Port Forwarding Settings?
To access port forwarding settings, log in to your Netgear Genie. Navigate to Advanced settings, then to Port Forwarding/Port Triggering.
Why Use Port Forwarding With Netgear Genie?
Using port forwarding with Netgear Genie ensures seamless access to internal network resources from external networks. It’s essential for gaming, remote desktop, and server hosting.
Can I Set Up Port Forwarding For Multiple Devices?
Yes, you can set up port forwarding for multiple devices. Assign unique ports for each device to avoid conflicts.
Conclusion
Setting up port forwarding with Netgear Genie can enhance your internet experience. It improves connection speeds for games and applications. Follow the steps carefully, and you can enjoy a smoother online experience. Remember, always keep your router’s firmware updated. This ensures security and optimal performance.
If you face issues, consult Netgear’s support resources. Troubleshooting tips can save you time and frustration. Happy browsing!