Changing your Wi-Fi network name, or SSID, is simple. It makes your network easy to recognize.
Your Wi-Fi network name is the SSID. Changing it can help you identify your network quickly among many others. Maybe you moved to a new place, or maybe you just want something more personal. Whatever the reason, updating your Wi-Fi name can bring clarity and a bit of personalization.
It’s not complicated, and you don’t need technical skills. In this guide, we will walk you through each step. By the end, you’ll have a new, unique Wi-Fi name that stands out. Ready to learn how? Let’s get started.
Introduction To Wi-fi Network Names
The SSID is the name of your Wi-Fi network. It helps you identify your network among others. SSID stands for Service Set Identifier. Every Wi-Fi network has an SSID. It is usually set by the manufacturer. You can change it to make your network easy to find.
Changing the SSID makes your network unique. It helps to boost security. This way, hackers cannot guess the default name. It also makes it easier for friends to find your network. Default SSIDs are often the same for many routers. Changing it helps you avoid confusion.
Credit: www.security.org
Preparing To Change Your Ssid
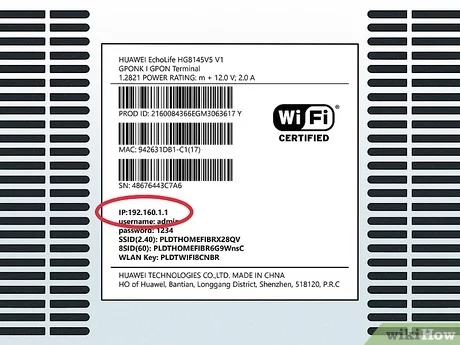
Before you change your SSID, collect all needed details. Find your router’s model number. This is usually on a label. Also, note down the default IP address. This helps you access the router settings. You will need the admin username and password. Check your router’s manual for these details.
Connect your computer to the router. Open a web browser. Enter the router’s IP address in the address bar. This opens the login page. Enter the admin username and password. Now, you can access the router settings. Look for the wireless settings option. Here, you can change the SSID.
Logging Into Your Router
To change the Wi-Fi name, you need your router’s IP address. This number is usually on the router. Look for a sticker on the router. The IP address is a set of numbers like 192.168.0.1. Write it down.
Open a web browser. Type the IP address in the address bar. Press Enter. A login page will appear. You need a username and password. These are usually on the router. Use the default login details if you have not changed them. These are often “admin” and “password”.
Credit: www.youtube.com
Navigating The Router Settings
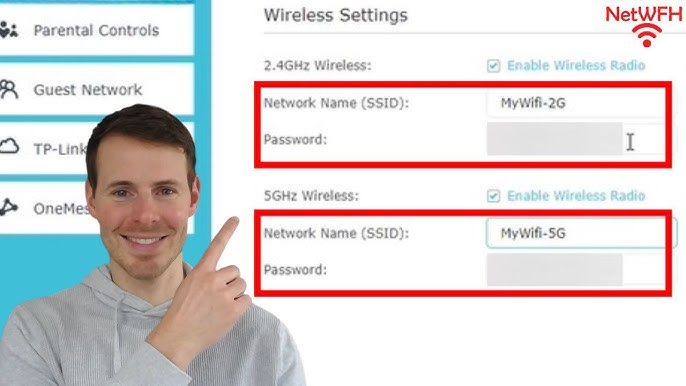
First, open a web browser. Type your router’s IP address in the address bar. Common IPs are 192.168.1.1 or 192.168.0.1. Press enter. Login to the router with your username and password. Now, find the Wireless or Wi-Fi settings. This is usually in the main menu or under a settings tab. Look for the SSID field. This is your network name.
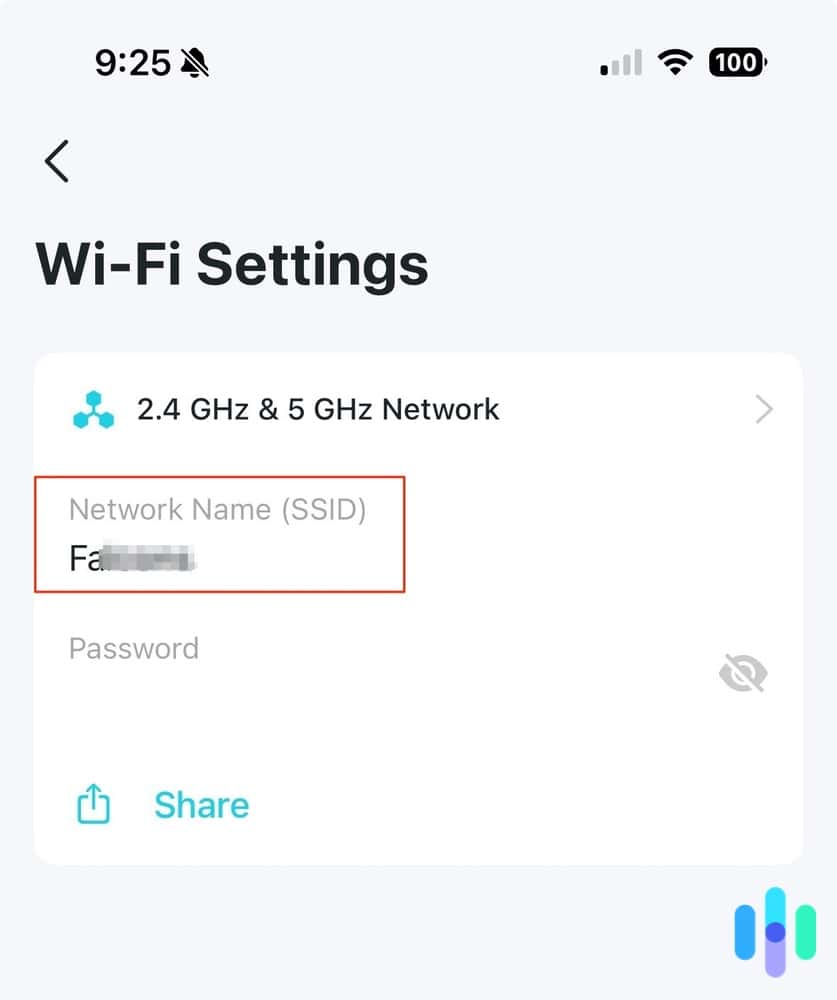
Once inside the settings, you will see many options. Look for Wireless Settings or Wi-Fi Settings. Here, you can change the SSID. Simply click on the SSID field. Delete the old name. Type your new network name. Save the changes. Your router may restart. Reconnect your devices to the new network name.
Changing The Ssid
First, log in to your router’s admin page. Use a browser for this. Find the “Wi-Fi Settings” or “Wireless Settings.” Look for the “SSID” field. This is your network name. Delete the old name. Type your new desired network name. Make it unique and easy to remember.
After entering the new name, find the “Save” or “Apply” button. Click it. Your router will restart. This may take a few minutes. Once done, reconnect your devices. Use the new network name. Ensure everything works fine.
Reconnecting Devices
After changing your Wi-Fi name, you need to update your devices. Open the Wi-Fi settings on each device. Find your new network name. Select it and enter the password. Now, your device should connect to the new network.
Sometimes devices may not connect. Restart your router and device. Check if you typed the password correctly. Ensure your device is within the Wi-Fi range. If problems persist, reset network settings on your device. This usually fixes most connection issues.
Enhancing Wi-fi Security
Choose a password with at least 12 characters. Mix letters, numbers, and symbols. Avoid common words or phrases. Do not use personal information. Change passwords regularly for better security. Do not share your password with others. Use a password manager to remember passwords.
Enable WPA3 encryption if available. WPA2 is also good. Avoid using WEP encryption. It is not secure. Check your router settings to enable encryption. Encryption protects data from hackers. It keeps your network safe. Always use the strongest encryption available.

Credit: www.wikihow.com
Tips And Best Practices
Pick a name that stands out. Avoid using common names. Try not to use personal information. This keeps your network more secure. A creative name can also make it easy to find your network.
Change your network name every few months. This helps to keep your network safe. It also stops others from accessing your network easily. Always write the new name down somewhere safe.
Frequently Asked Questions
How Do I Change My Wi-fi Ssid?
To change your Wi-Fi SSID, log in to your router’s admin panel. Navigate to the wireless settings, and locate the SSID field. Enter your new desired network name and save the changes. Reconnect your devices using the new SSID.
Why Should I Change My Wi-fi Ssid?
Changing your Wi-Fi SSID can enhance security and personalize your network. It helps prevent unauthorized access and makes your network easily identifiable. A unique SSID also reduces interference from neighboring networks.
Will Changing My Ssid Affect My Devices?
Yes, changing your SSID will disconnect all previously connected devices. You need to reconnect each device using the new SSID. Ensure you update the network settings on all your gadgets.
What Is A Good Ssid Name?
A good SSID name is unique, easy to remember, and not too personal. Avoid using personal information like names or addresses. Creativity and simplicity are key for a memorable and secure SSID.
Conclusion
Changing your Wi-Fi network name is simple. Follow the steps outlined in this guide. A unique SSID helps identify your network easily. It also adds a personal touch. Remember to save changes after renaming. New name not showing? Restart your router.
Keep your network secure with a strong password. Regularly update your SSID for better management. Happy browsing with your new Wi-Fi name!