Struggling to deploy your network with Vsol Gpon OLT, want to create a secured network, and can’t find any helpful information on the internet. Don’t worry here I will guide you in detail Vsol Gpon OLT configuration step by step. Vsol GPON OLT configuration little bit difficult than Vsol EPON OLT. This article will configure vsol gpon olt using few steps with VLAN. Let’s begin
Step 1: OLT Access
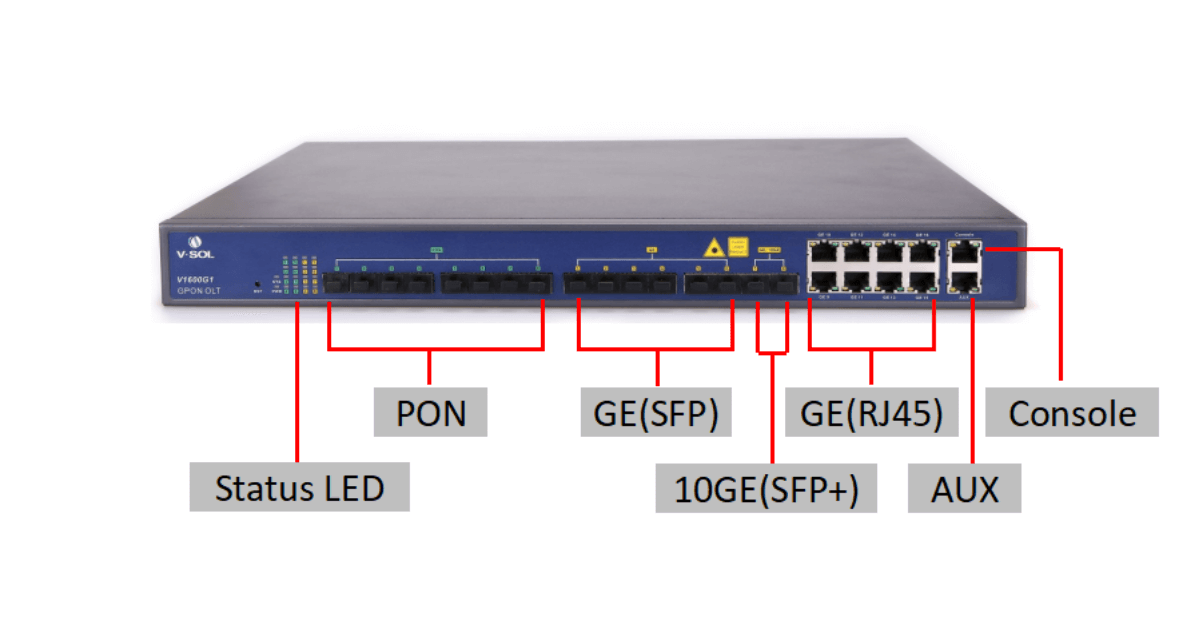
Configuring any network device first you have to log in to the device. Here vsol gpon olt, you can log in using AUX port also using the console port.
Access using AUX Port.
If you want to access your olt using AUX port first you need to connect an Ethernet cable to your PC to OLT AUX Port.
VSOL GPON OLT has a fixed static IP address at AUX Port 192.168.8.200. For accessing this IP you need to change your pc LAN IP using the same subnet. We change our pc IP to 192.168.8.201 and subnet mask 255.255.255.0.
Now we can access olt via Telnet (192.168.8.200) or web management https://192.168.8.200
Console Access:
Connect your PC to OLT Console port using Console cable. Console cable available at your OLT Packet. You need to USB TO Serial converter to connect.
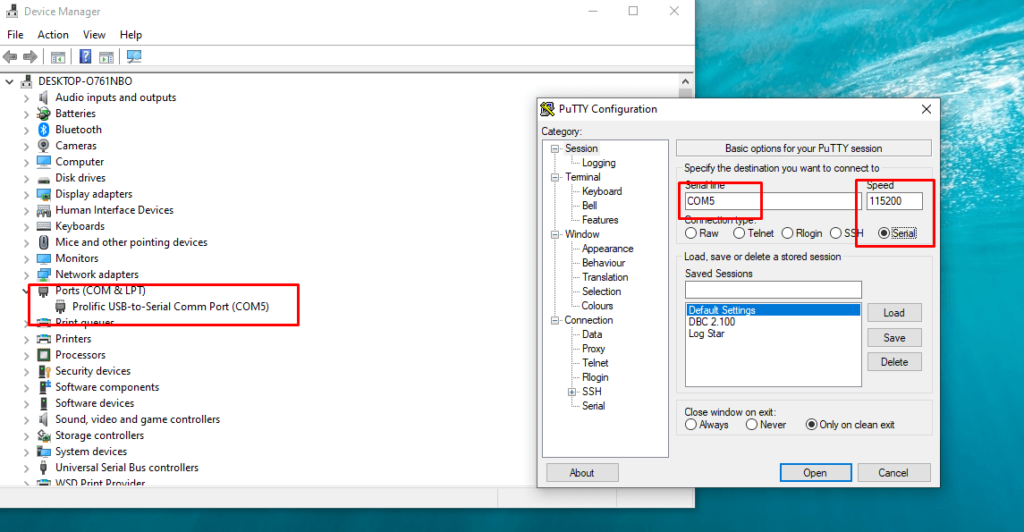
To get the CLI interface of OLT needs to use software like putty. And make sure to select speed 115200
Vsol GPON OLT default IP address
VSOL GPON OLT Default access
IP=192.168.8.200
Username – admin
Password- Xpon@Olt9417#

Step 2: Uplink configuration with VLAN
Assume we have 8 port vsol gpon olt and configure different vlan to each pon port, 8 pon port with 8 different vlan
Let’s create vlan 200-208 and configure up link port G16 as a Trunk port
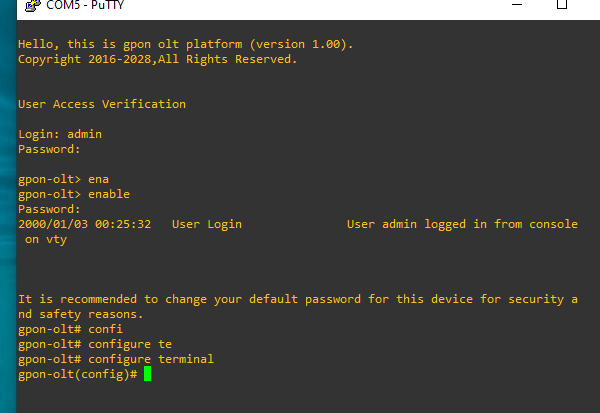
Username-admin
Password-Xpon@Olt9417#
gpon-olt> ena
Xpon@Olt9417# (enable password)
gpon-olt# configure terminal
gpon-olt(config)# vlan 200 – 208
gpon-olt(config)# exit
Successfully created vlan 200-208 and we use vlan 200 for olt remote management and vlan 201 to 208 for PON Port.
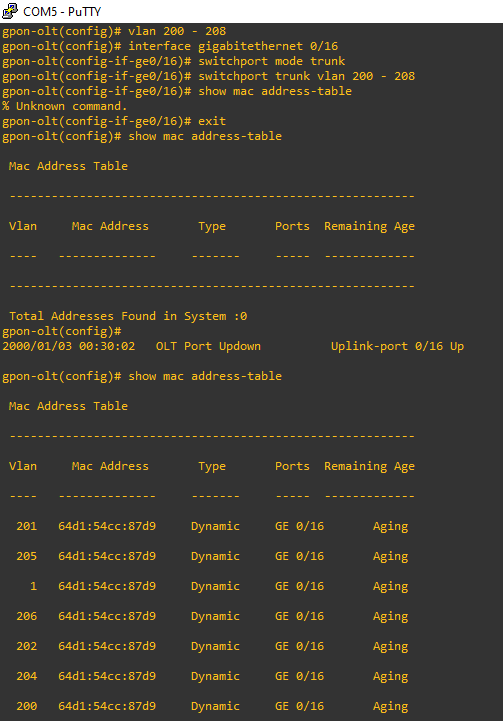
Now let’s tag vlan to our uplink port g16
gpon-olt(config)# interface gigabitethernet 0/16
gpon-olt(config-if-ge0/16)# switchport mode trunk
gpon-olt(config-if-ge0/16)# switchport trunk vlan 200 – 208
gpon-olt(config-if-ge0/16)# exit
Vlan configured successfully with G16 Port we can check mac address using below command
gpon-olt(config)# show mac address-table
Assign IP address
We can access OLT from our local network using a local subnet IP address also we can access olt any network using public IP address.
Let’s assign IP address to vlan 200 for olt remote access using below command
Assign ip address to vlan 200
gpon-olt(config)# interface vlan 200
gpon-olt(interface-vlan-200)# ip address 192.168.3.200 255.255.255.0
gpon-olt(interface-vlan-200)# exit
gpon-olt(config)# ip route 0.0.0.0 0.0.0.0 192.168.3.1
Here our router ip address is 192.168.3.1 and OLT IP address is 192.168.3.200. It’s a private ip address so that we can easily access olt using this ip address from our local network.
Telnet permission
Telnet is a protocol that provides a command-line interface for communicating remote devices such as switch router servers etc.
By default telnet port is deny from the olt firewall, for access telnet need to allow telnet permission
gpon-olt(config)# no login-access-list deny telnet 0.0.0.0 0.0.0.0
Now we can access olt via telnet
That’s all we already configured our olt uplink configurations. Lets configure PON (Passive Optical Network)
Step 3: Creating ONU Profile
In this step, we will create a profile for ONU. Every GPON Olt we need to create a profile for ONU. Here we can configure for 1 port onu 4 port onu like this. Let’s create an onu profile for 1 port onu
gpon-olt(config)#profile onu id 10 name gpononu
gpon-olt(profile-onu:10)# port-num eth 1
gpon-olt(profile-onu:10)# commit
gpon-olt(profile-onu:10)# exit
gpon-olt(config)# onu auto-learn default-onu-profile xpon
Here successfully configured an ONU Profile Named gpononu and where onu id 10 and it’s a 1 Ethernet port onu.
Step 4: Creating DBA Profile
DBA means Dynamic bandwidth allocation. This step we will create a DBA profile for ONU bandwidth. Every GPON OLT like Huawei GPON OLT must to create DBA profile
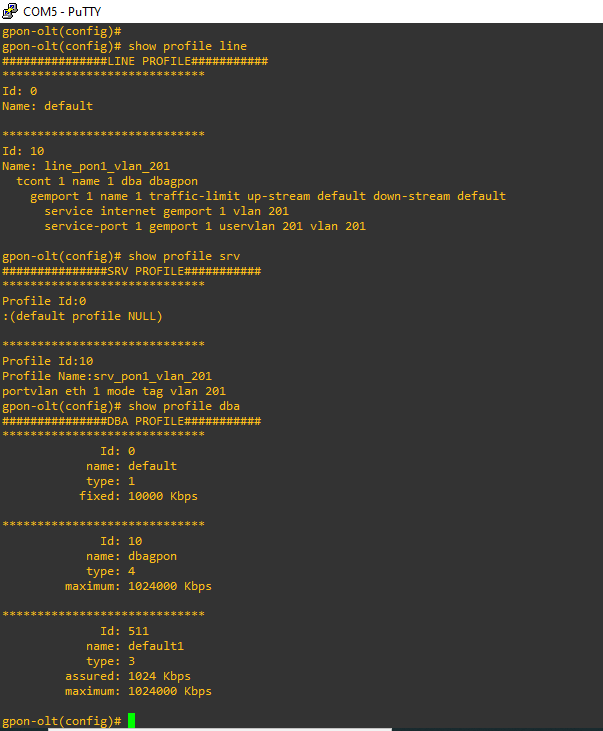
gpon-olt(config)# show profile dba
using this command we can see a list of dba profiles, now we are creating a dba profile which id will 10 and name dbagpon.
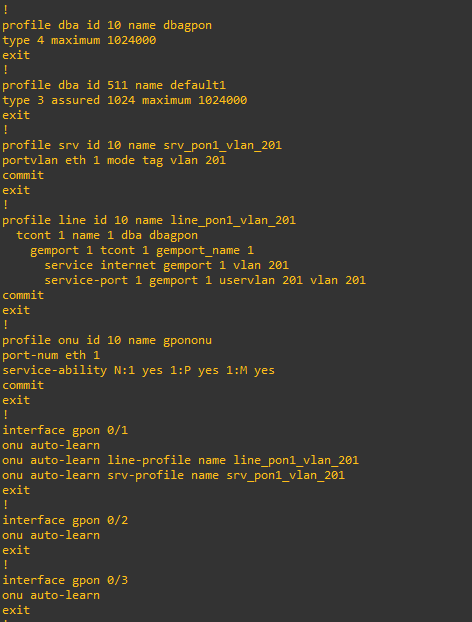
gpon-olt(config)# profile dba id 10 name dbagpon
gpon-olt(profile-dba:10)# type 4 maximum 1024000
gpon-olt(profile-dba:10)# commit
gpon-olt(profile-dba:10)# exit
Delete DBA Profile
gpon-olt(config)# no profile dba id 10
Using this command we can delete dba profile.
Step 5: Creating Service Profile
we have almost complete vsol gpon olt configuration. few step left.
In this step, we will create a service profile where the profile id is 10 and the profile name srv_pon1_vlan_201 (you can change the profile id and name as you wish) and tag VLAN to the onu ethernet port.
gpon-olt(config)# show profile srv
gpon-olt(config)# profile srv id 10 name srv_pon1_vlan_201
gpon-olt(profile-srv:10)# portvlan eth 1 mode tag vlan 201
gpon-olt(profile-srv:10)# commit
gpon-olt(profile-srv:10)# exit
Delete Service Profile
gpon-olt(config)# no profile srv id 10
Step 6: Creating Line Profile
In this step we will create a line profile and create tcont and add tcont with dba profile and also deleare vlan to service port.
gpon-olt(config)# show profile line
gpon-olt(config)# profile line id 10 name line_pon1_vlan_201
gpon-olt(profile-line:10)# tcont 1 name 1 dba dbagpon
gpon-olt(profile-line:10)# gemport 1 tcont 1 gemport_name 1
gpon-olt(profile-line:10)# service internet gemport 1 vlan 201
gpon-olt(profile-line:10)# service-port 1 gemport 1 uservlan 201 vlan 201
gpon-olt(profile-line:10)# commit
gpon-olt(profile-line:10)# exit
Step 6: Bind Profile to PON Port
That’s all we successfully configures vosl gpon olt step by step. now we will assign line profile and service profile to PON Port. and also enable onu auto-learn option.
PON port 1
gpon-olt(config)# interface gpon 0/1
gpon-olt(config-pon-0/1)#onu auto-learn
gpon-olt(config-pon-0/1)# onu auto-learn srv-profile name srv_pon1_vlan_201
gpon-olt(config-pon-0/1)# onu auto-learn line-profile name line_pon1_vlan_201
now we can get internet from PON port1. if you have more ports of your olt using the above guide you have to create a line and service profile for each pon port and bind the profile to this pon port. That’s all. you have any queries plz contact us. I will definitely help to yo configure your olt.
Troubleshooting:
gpon-olt(config-pon-0/1)# show onu info
gpon-olt(config-pon-0/1)# show onu 2 optical_info
gpon-olt(config-pon-0/1)# show onu 2 distance
gpon-olt(config-pon-0/1)# show onu 2 profile
gpon-olt(config-pon-0/1)# show onu 2 eth
gpon-olt(config)# interface gpon 0/1:2
gpon-olt(config-pon-0/1)# description office
gpon-olt(config-pon-0/1)# loopback enable
Conclusion:
we have successfully configured Vsol Gpon OLT configuration step by step. Hope you can now easily configure your lot. if you have any issue regarding any configure query, lets us know we will help you to configure your GPON OLT.
Lastly, for more informative blogs like this stay tuned to our blog.
Phyhome router is not working. Please help me.